
Of Old Radios And Related Items--Published Monthly
Wire Recorder Project
Recovering Family Steel Wire RecordingsBY NICK GENT
Web Edition
Perusing radio/phono discussion groups online can yield rewards. A chance look at http://groups.google.com/group/rec.antiques.radio+phono led us to the following article. We appreciate Nick Gent's granting us permission to reprint the article. Nick himself had gone to this site to solicit help on his project -- another example of the importance of the Internet as a research tool in the preservation of radio history. (Editor)
My grandfather was a remarkable man who was fascinated by technology and built all kinds of electronic and mechanical gadgetry during his lifetime. He started working on electronic home projects in an era when components were only just becoming available to hobbyists. Among other things, he built electronic musical instruments, radios, and even a TV, around which all the neighbors gathered to watch some of the first BBC broadcasts from the Crystal Palace in London where he lived.
In the late 1940s, he built an electronic wire recorder. Tape recording had not yet been introduced commercially and steel wire, thinner than a human hair, was the only medium available for making audio recordings. Although by this time wire recorders were being introduced to the domestic market in America, in Britain they were still a rarity, confined mainly to the military and to offices where they were used as dictaphones.
Figure 2. One of the homemade spools that did not fit any commercially-made wire recorders.My grandfather was able to use his wire recorder, along with a homemade microphone, to make recordings of my family, including my great grandparents and my mother as a little girl. He also recorded all his favorite music from the radio and even copied a couple of old 78 rpm discs. His recorder is long gone, but about 20 spools of wire have survived and have remained tantalizingly silent -- until now! The stacked spools are shown in Figure 1 (see print version).
My grandfather made his own spools, one of which is shown in Figure 2. Needless to say, they don't fit any commercially available recorders!
Webster-Chicago Wire Recorders
To play these wires I needed to get hold of a vintage wire recorder. These old recorders are very rare in Britain, but by an extraordinary co-incidence the only ones I could find for sale in the whole of the UK were from a dealer just a few kilometres from my home in Edinburgh, Scotland. He had two "Webster-Chicago" (or "Webcor") recorders in unknown condition and let me have them both for a reasonable price.
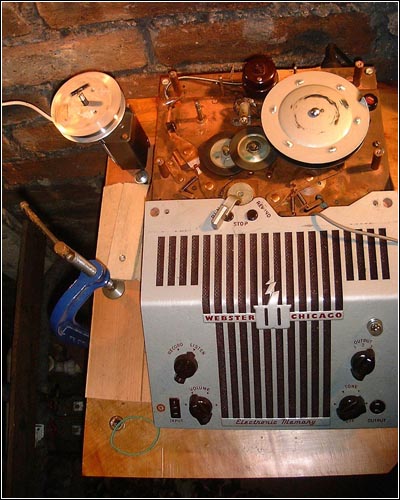
The two recorders are a Webster-Chicago Model 180, shown in use in Figure 3, and a Model 288, shown in Figure 4 (see print version). The Model 180 is a popular domestic model from about 1948. The one I bought had been modified for the UK market by the addition of a 240V-120V step-down transformer.
Figure 3. The Webster-Chicago Model 180 used by the author to recover his grandfather's old recordings.The Model 288, ca 1950, is a slightly updated version of the Model 180. It has a somewhat bigger cabinet than the Model 180 cabinet with an improved audio response and an improved antispill mechanism. The set that I bought has an ominous smell of wood smoke, and I haven't had time to open it up yet, let alone restore it!
A spool for a Webster-Chicago wire recorder is shown in Figure 5 (see print version). Several of these came with the wire recorders that I bought.
There are some excellent resources on the web describing the history of Webster-Chicago (well, it used to be located there!), and just about everything you need to know if you own a wire recorder. I'm very grateful to the authors of these sites. Among the sites are http://members.aol.com/webcorinfo/webcor and http://www.soundsaver.com/webster-chicago,etc.htm.
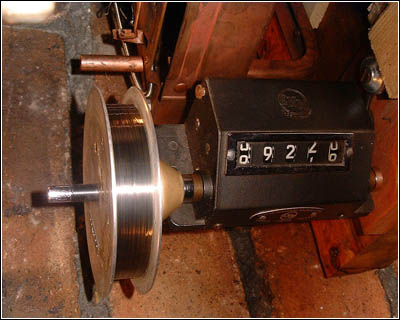
Figure 7. An old mechanical counter was used to hold the homemade spools.The Recovery Process.
Using information gathered from these sites, I now knew what I had to do in order to play back the wires. I chose to work on the Model 180 as it seemed to be the cleanest, and, as it turned out, was adapted for UK mains voltage. The steps were as follows:
1. Restore the mechanical operation of the Model 180. First, clean and lubricate all mechanical parts, especially the "bailer" mechanism which ensures the wire is correctly bailed onto the spools. The failure of this mechanism results in disastrous tangles!
Finally, replace the felt pads and adjust the mechanism that is used to "brake" the rotating spools.
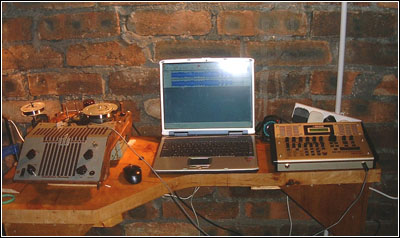
Figure 9. The dubbing setup includes a modified Webster-Chicago Model 180, left; a laptop computer running Audacity software, center; and the guitar preamplifier, right.Applying just the right pressure to the spools ensures that they are packed tightly after play or rewind. Figure 6 (see print version) shows the pressure pad brake mechanism.
2. Isolate the original electronics so that the set is not powered-up, and take a feed directly from the playback head. This minimizes any hum on the audio, and gives the highest quality audio output.
3. Take the audio output to some kind of amplifier and find a way of feeding it to an audio recording application on a PC.
4. Once the original Webster spools can be played back in this configuration, build a separate playback spindle to hold my Grandfather's "non-standard" spools so that they can be played back onto the take-up spool of the Webster machine.
With my uncle's help, I quickly got the set playing back the original Webster spools through a guitar amplifier. As Figure 7 shows, my uncle had found an old mechanical counter that I anchored to a bench, and this provided a perfect spindle to hold my grandfather's spools. It was necessary to completely remove the Webster's own playback plinth because it got in the way.
Digitizing the Audio
I wanted to digitize the audio from the playback head at the earliest possible stage. This was done by feeding the output from the head straight into a guitar preamplifier unit with a digital output. This unit is shown in Figure 8 (see print version).
The guitar preamp immediately digitizes the sound and then offers a wealth of preprocessing before the digitized sound is fed to a laptop via USB. I used the preamp to get the levels optimized for the laptop, and to equalize the sound to get the right balance of treble and bass. My setup is shown in Figure 9.
On the laptop, I ran Audacity, a freely available audio recorder and editor from those wonderful people at Sourceforge. See online sourceforge.net/project/audacity. This fantastic piece of software enabled me to do the following:
·Record all the wires
·Post-process the recordings to:
·Reverse any wires that were spooled backwards (several of them were!).
·Adjust the levels of any sections of the recordings that needed it.
·Edit out bad noises when things went wrong!
·Speed up the recordings to account for differences in recording and playback speed.
·Convert to MP3 format for efficient storage on hard disk and CD.
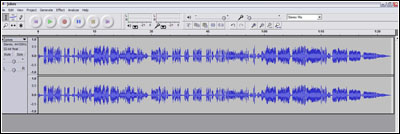
A screen shot of the Audacity display is shown in Figure 10.
The ability to change the speed of the recordings was crucial. It seemed that these recordings were not made at a consistent speed. It was difficult to judge what was the correct speed for any given recording, but I mainly used the pitch of musical instruments (along with a guess at what key they were playing in) in order to work it out.
In some cases, I could use the frequency of mains hum (which is a very constant 50 Hz and probably was so, even in the 1940s and 1950s) measured, using Audacity. I needed to speed up the recordings by an average of 7 percent, and sometimes as much as 10 percent. This showed that my Grandfather's machine recorded faster than the Webster, probably to achieve a better fidelity with lower qualitycomponents.
Figure 10. The laptop computer screen display running Audacity. Not only could you hear the sounds, you could see them too!Playback
The playback process, miraculously, went without a single problem. My only job was to keep an eye on everything and to listen as the sounds played back for the first time in decades, bringing back so many voices and sounds from my past. There were some tearful moments as I heard my grandfather playing the piano again, as I remember him doing when I was a kid. There were lots of laughs as I heard great grandparents telling stories in accents that don't exist today!
Strangely, some of the wires had deteriorated and provided a very poor quality sound, but others sounded fresh and as if they were recorded yesterday. There was no correlation with the age of the recording. The earliest recordings were among the best.
So playback turned out to be easy. The one small snag was that I needed to rewind the wires back from the take-up spools onto their original spools. Because I was playing them off a "passive" spindle, I could not use the Webster's own rewind mechanism.
After some experimentation, the solution turned out to be an electric drill with a large rubber grommet, as Figure 11 (see print version) shows. The grommet had to be held manually against the spool to turn it, dragging the wire back from the take-up spool (which, luckily, drives the bailer mechanism) at about 2 times playback speed. This was tiring, and the slightest wobble meant a big spill of wire, which would take hours to untangle. I only had a couple of big spills that luckily affected less important passages on the wires.
Now that the contents of the wires are safely captured, the next project is to fully restore at least one of the Webster recorders. With some carefully placed bits of connector block inside the Model 180, it will still be easy to isolate the old electronics and take a feed directly from the playback head for any future audio recovery projects. Feel free to contact me if you have any wire spools that I may be able to help with.
Nick Gent, 4 Eskview Villas, Dalkeith EH22 3BN, UK. NickGent@compuserve.com. Your Wire Recorder Project, wirerecorder@gentweb.co.uk.
Nick Gent, an electronics design engineer, works in Embedded System design for the Telecomm industry. His interest in electronics began as a boy when his grandfather helped him build a shortwave Ham band receiver. It was a direct conversion design based on a MOSFET, and his grandfather even had him build the aluminum chassis to house all the components. Nick is also a jazz musician, playing gigs in and around his hometown of Edinburgh, Scotland, where he lives with his wife and daughter.
General Electric Model GD-60
BY RICHARD ARNOLD
Web Edition
Richard Arnold describes a set in poor condition that appears to have had additional damage as a result of bad packing. But he did what every avid collector would do and restores it to good condition. (Editor)
Here is a somewhat unusual looking radio with a slant-front and no dial scale. I found it on eBay a while back, and even though the cabinet looked as if it was in bad condition, the chassis looked pretty good in the pictures. I decided to bid on it because of the unusual look, and I thought it would be a good restoration project.
When the radio arrived, the cabinet had completely fallen apart in the box. Nothing was actually broken it just had fallen apart at the seams. Luckily, the chassis was still attached to the bottom part of the cabinet, and it was not harmed. In fact, the chassis was in very good condition, considering, and it even worked. The speaker had some holes in it and some of the grille cloth was missing in places, but that was easily replaced. What was amazing was that the tubes were not all broken up. I knew the cabinet needed work, but I didn't expect this disaster.
The Model GD60
The General Electric Model GD-60, shown in Figure 1, is a compact, 5-tube, AC-DC superhet receiver. It is rather small, measuring only about 13" wide x 71/2" tall x 6 1/2" deep at the base. The tube types used in this radio are the following: a 6A8G converter and oscillator; a 6K7 IF amplifier; a 6Q7 detector, AVC, and amplifier; a 25L6G power amplifier; a 25Z5 rectifier; and finally, a 49-A ballast tube. No dial light is used in the radio, and the IF is 455 Kc.
Some of the set's other features include an IF wave trap, an automatic volume control and an improved dust-proof speaker. The set incorporates a trimmer-tuned, "Touch-Tuner," push-button system, allowing the set-up of five stations for automatic tuning. The trimmers for the Touch-Tuner are attached to a framework that lies across the workings of the chassis and is fastened to the underside of the chassis by four screws.
I have a few push-button radios in my collection, but this is the first one that I have seen with this configuration. I have, however, talked to another collector who has a number of push-button radios in his collection, and he said that this configuration is rather common.
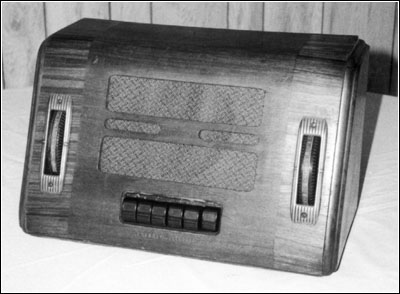
Figure 1. The General Electric Model GD-60.Looking at the front of the radio, you will notice the absence of the usual slide-rule dial. What there is though are two thumbwheels, similar to those that you might find on early battery sets of the 1920s, like a Radiola 20, or on early cathedral sets, like maybe an Echophone S-2. The thumbwheel on the left side of the grille cloth is the on/off and volume control, while the thumbwheel on the right of the grille cloth is the dial scale. The grille cloth is not original.
There are six push buttons, five of which you can preset by tuning the antenna and oscillator trimmers that are attached to a metal framework covering the center part of the underside of the chassis. The push button on the far right is the button that changes the tuning from manual to automatic.
The cabinet has just been reconditioned. I didn't have to restore it. After I got it put back together, all it needed was just a good cleaning and some touchup work. What appears to be inlaid wood on the ends of the wood cabinet is painted on.
According to a copy of a General Electric pricing schedule, shown in Figure 2 (see print version), dated January 3, 1939, the Model GD-60 sold for $22.95. I kept track of a few of these sets as they came up on eBay. The ones that I have seen there have all been pretty rough looking, including mine, and they went for around $18 to $35.
I was lucky as this one cleaned up pretty well, and when I was all done fixing it up, it made an interesting looking addition to the collection. I have it sitting on top of one of my few console radios and I play it once in a while. I like it, as it sounds good and has good selectivity.
Reference:
Rider, John F. Perpetual Trouble Shooters Manual , Vol. X, pg. 10-3. New York: John F. Rider, Publisher.
(Richard Arnold P.O. Box 275 Lone Grove, OK 73443. Arnold@brightok.net)
Richard Arnold, a frequent contributor to A.R.C., has been collecting radios since 1985. His interest is primarily in cathedrals and 1920s battery sets, and his collection ranges from crystal sets to a 1928 American Bosch in a Pooley cabinet. His prize is the 1932 Jackson Bell Peter Pan featured in the June 1991 A.R.C.

| [Free Sample] [Books, etc., For Sale] [Subscribe to A.R.C./Renew] [Classified Ads] [Auction Prices] [Event Calendar] [Links] [Home] [Issue Archives] [Book Reviews] [Subscription Information] [A.R.C. FAQ] URL = http://www.antiqueradio.com/Nov06_Gent_Recorder.html Copyright © 1996-2006 by John V. Terrey - For personal use only. Last revised: November 6, 2006. For Customer Assistance please contact ARC@antiqueradio.com or call (866) 371-0512 toll free Pages designed/maintained by Wayward Fluffy Publications
Antique Radio Classified |