VOLUME 16 FEBRUARY 1999 NUMBER 2
VOLUME 16 FEBRUARY 1999 NUMBER 2
Restoring A Zenith 5S327: My Favorite Table Radio
BY BOB SNIVELY -- Web EditionThe labor of love described in the following article may inspire many of you to try to restore a seemingly irredeemable set to its original splendor. As Bob points out, restoration projects take lots of patience, but the rewards can be great. (Editor)
My love affair with old radios started just a few short years ago. I purchased an Airline console radio at a garage sale because it had a "Waterfall" style cabinet that looked just like the dining room suite that my wife Juli, and I had purchased a short time before. Not knowing if the set would ever work again, I found a local lifelong collector by the name of Lionel Haid to restore the chassis while I spent a few weeks restoring the cabinet. Once we had completed the work, I fired the set up, and wow, what a wonderful sound! The 6U5 tuning eye tube glowed a beautiful green, and my life has never been the same!
Unfortunately, Lionel passed away before I really got the chance to know him well. But, on the few occasions I visited him in his home, his enthusiasm and wealth of information has inspired me for every restoration project since.
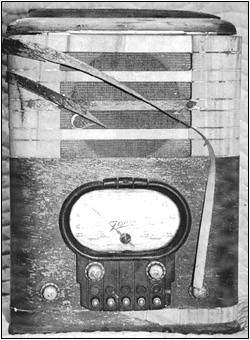
In the summer of 1997, I purchased the Zenith 5S327, shown in Figure 1, in an antique store as a parts set for a whopping $7.50! I figured I could always use a few more Zenith parts in my basement shop. I tried to hide it from my wife, but Juli caught a glimpse of it in a box one day and said to me, "You actually paid money for that?" I finally got around to seeing if it was worth restoring in December 1997. Now restored, it is my favorite radio.
Electronics Repair
First, I carefully pulled the chassis and speaker and started the usual cleaning of the chassis. I tested the tubes on my Hickok 600A and found that only the Type 6K7 IF amplifier tube was strong. I also found all the original paper/wax capacitors to be in very poor condition. Using Nichicon caps from Frontier Electronics, I completely recapped [replaced all old capacitors with new ones] the chassis and reinserted the Type 6K7, along with replacement GT-style tubes I had in stock. I then started bringing the voltage up slowly on a homemade isolation transformer. Lo and behold, a working chassis!
With very minor alignment adjustments of the trimmers, I couldn't believe how sensitive this set was on both AM and shortwave. As I do with all my radios, once I had the set working I let it play all the time I was working on other projects. That way I could be satisfied that it was going to work consistently well.
Figure 1. Hi. I am Zenith Model 5S327. This is what I looked like when my new owner took me home.
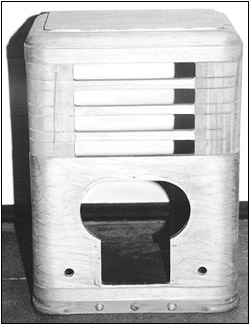
Figure 3. Now I'm feeling better, as if I'm coming out of my old shell.By the time I went to bed that night, I had decided that this radio was really fine, and I said to Juli, "Darn it, now I have to restore the cabinet!" We both laughed, knowing that's what I had wanted to do all along.
Cabinet Repair
As seen in Figure 2 (see print version), the top of the cabinet had separated from the rest of the wood, probably from being picked up by the back. The veneer on the top piece was also curled up, but appeared to be in decent shape other than a few small dents. The sides of the cabinet had serious delamination problems, along with the obvious loose and missing veneer strips that make this particular model such an attractive late '30s table set.
When starting a project of this magnitude, the restorer should keep a few thoughts in mind at all times: 1) Do not be in a hurry. It took many years for this set to get into this state of disrepair, and it is not going to be like new overnight. 2) Do not worry about making a mistake. If you do -- and you probably will -- when you start over, you'll know what not to do the next time. With all this in mind, let's get started.
I like to start by evaluating the damage to the cabinet. My brother-in-law Rick White, an auto repairman, taught me years ago that in order to pull the damaged part back to its original position, you must determine the direction the impact occurred. A radio cabinet is somewhat the same thing. You first must assess what has happened, and then return it to its original position.
Before the top of the cabinet could be reattached to the "body" of the cabinet, the body and top had to be as they were when the set was originally assembled. I first stripped the body of all loose pieces of veneer; then, through a series of glue and clamp sessions, the laminations of the cabinet structure became more rigid. I can't tell you how many times it took, maybe 10 or 12 different attempts, until all areas were tight.
The large piece of veneer that wraps around the front and sides was in very good condition, but it was loose (bubbled) around the dial bezel opening, the knob holes, and along the vertical sides near the back. I used Elmer's Glue, C-clamps, spring clamps, and small flat pieces of thin plywood to keep from denting the veneer and to get a good, flat adhesion to the cabinet. This takes lots of time -- be patient!
As I worked on this part of the cabinet, I would keep finding other small areas where the laminations were not as obviously loose until the areas around it were tightened with glue. Also, the bottom piece of plywood to which the chassis screws attach was delaminating. It got the same glue and clamp routine.
Once the body of the cabinet was tight, I then worked on the top. I was able to remove the curled piece of veneer carefully by applying a slight lifting pressure with one hand, and sliding a thin putty knife underneath it, releasing the dried-up original veneer adhesive. There is also a "binder" layer of softer wood, appearing to be poplar, with the grain running in the opposite direction of that of the visible veneer. This helps keep the veneer from curling. I removed it in the same manner.
In a bench vise, I glued and clamped these larger layers together, being very careful to have the layers in their original alignment. I had soaked the veneer and binder layers with tap water, so they would be workable. If you don't do this, you probably won't be able to do it in one step as I did. Once this procedure was finished, I was ready to reattach the top to the body.
Unfortunately, when the top separated from the body, a strip of interior laminate above the speaker had stayed attached to the top. I made sure this area, along with all other mating surfaces, had the old glue removed or sanded until a series of trial and error fittings yielded a nearly perfect match to both pieces. Once glue was applied to all the corner blocks, cabinet edges, and anywhere else the two pieces would mate, I clamped the top to the body with bar clamps. These ran from the bottom of the body to the top of the top piece. Also, one bar clamp was used to hold the upper rear sides at the proper width; otherwise, they seemed to want to spread apart when pressure was applied from the top to the bottom. I set aside this assembly for a couple of days for complete drying.
At this time, I took time out to order some speaker cloth from Antique Electronic Supply in Arizona. I found their part #SG-440 to be a very close match to the original. As I said before, patience is a virtue. It was then time to take off the bar clamps, and when I did, the cabinet started to look like a radio again.
I finished removing what was left of the old finish on the remaining areas of the cabinet -- both the original pieces of veneer, the carved area of the top, and the solid wood along the base. I thoroughly sanded these areas with 180 grit, and then 220 grit.
Then I worked on the areas where the veneer needed to be replaced. With some odds and ends of veneer I had in my scraps, I replaced the binder layers of poplar, along with the speaker cutouts. All areas receiving new veneer were sanded.
The veneer strips on the model measure 3/4" wide, except for the three darker strips that form the speaker cut-out horizontals. These measure approximately 1/2" wide. I found new veneer in the 7/8" wide rolls used for cabinet resurfacing. The mahogany was an exact match to the original grain.
I should mention that, although my veneer strips were in horrible condition, the narrow three strips were darker than the wider strips. It is my belief that Zenith must have treated these strips with a shot of toner when the finish was applied, because they were not as dark as the very top or the base-toned areas of the cabinet. However, they were definitely darker than the rest of the veneer on the cabinet.
I started by trimming my new veneer to the exact original widths and cutting them longer than needed. I would trim them later. The uppermost and lowermost strips were the 3/4" variety. I started by masking off the immediate area with 1" masking tape and then brushed "Weldwood" contact adhesive to the binder substrate of the cabinet. Then, I taped my strip upside-down on a work surface and brushed an even coat on it. (You have to wait about 30 minutes for the glue to tack.)
Next, using extreme patience, I attached the strips to the cabinet. I started at the back edge of the cabinet, laying each one down slowly toward the front, and then carefully around the rounded corner, across the front, around the other corner, and toward the back. Once I had the strip in place, I then took a small wooden wallpaper seamroller and rolled it firmly in place. I repeated this six or seven times to assure a tight, uniform bond to the cabinet. Then, using a single-edge razor blade, I trimmed the veneer strip flush with the back edge of the cabinet. I used the same procedure for the remaining strips, each time making sure to mask each side of the area before brushing glue. If you skip this step, the small gaps between the strips of veneer will be very difficult to clean out later. Once all the veneer strips were in place, a very, very light sanding with 220 grit sandpaper made everything look smooth. Figures 3 and 4 (see print version) show the cabinet ready for refinishing.
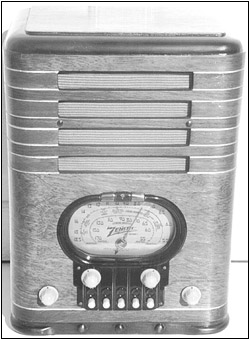
Figure 6. Well, now I can face the world. I stand in state in my owner's dining room and play beautifully.I stained the entire cabinet with a mixture of walnut, honey, and dark mahogany, oil-based stain to get a tone as similar to the original as possible. Then, I masked everything but the three horizontal strips, the upper curved area of the top, and the solid wood base. I sprayed a very light coat of lacquer toner on the speaker strips. Subsequent heavier coats were applied to the upper and lower areas until the proper shade was achieved. After this dried for a day, I applied a clear lacquer spray, used #0000 steel wool between coats, and after about three applications of this process, applied a buffing and wax.
The functions of the lower right knob (band- switch) were originally marked with decals. Fortunately, Antique Electronic Supply sells a Zenith decal sheet that has the exact lettering needed. I applied these in their original positions after the second, but before the third coat of clear was applied. This process results in a beautiful job and makes rubbing off very unlikely.
Final Cosmetics
The bezel was stripped of its original finish and a transparent black spray applied. Although this process has produced a darker bezel than the original, it looks very nice. I may try toner someday to try to get a little closer to the original color used by Zenith. The push buttons were thoroughly cleaned.
Before final assembly, I applied the gold paint between the veneer strips with a small artist's brush and 1-shot sign lettering enamel. Also I painted the interior of the cabinet with a flat satin black.
I was deeply honored when my efforts were rewarded at the Indiana Historical Radio Society (IHRS) Winter Meet on February 14, 1998. My Zenith was awarded a blue ribbon in the "My Favorite Table Radio" tube-type category. When I got home that day I could hardly wait to call Lionel's wife Mary and tell her all about my blue-ribbon Zenith. We both laughed and decided that Lionel already knew about it and was proud of me.
If there is one thing I remember most about Lionel, it's the fact that you should never forget the real objective of antique radio collecting -- enjoy the hobby as a labor of love and not just for the monetary value the set may have.
As for Juli's thoughts on my junker set, it has now found a permanent home on our waterfall-style buffet in the dining room. I hope all this makes sense to some of you. I'm sure there are better ways to do some of the processes I've described, but perhaps this will inspire some of you to restore the overlooked gems that otherwise might find themselves in the trash.
Happy Listening!
(Bob Snively, 510 South 10th St., Richmond, IN 47374)
Bob Snively wants to dedicate his article to his late friend Lionel Haid, who inspired his interest in old radios. Since 1995, Bob has collected 78 phonographs, records, and just about anything Zenith from the '30s and '40s. His 40th birthday surprise from his wife Juli was an original Majestic "Charlie McCarthy" radio.